The Best Way to Export a Web-Ready SVG from Illustrator (2018)
August 29, 2018 · Yi Qian · Web Design · Everything SVG
When exporting SVG from Illustrator, you're prompted with many options. So which settings are the best to produce a web-ready SVG?

A web-ready SVG should help you to avoid problems like:
- Inconsistency in fonts displayed
- Embedded images in SVG not showing up
- Having a giant SVG file size
- Exported SVG appears to be different from your original design (breaking images)
- Unable to easily edit your exported SVG codes for animations or interactivity
There are 2 main approaches in exporting a web-ready SVG from Illustrator, mainly based on how you're using it on your website:
One being <object> tag or Inline, and the other being <img> tag.
We recommend sticking with <img> tag, unless you're using SVGs for animations or to do some interactivity. To understand why, read here.
We have experimented on what's the best settings for both approaches, and here's the results.
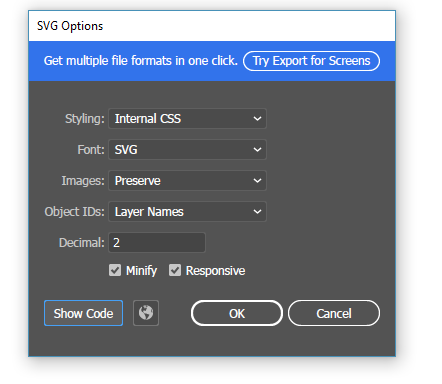
To ensure you export an SVG that is web-ready from Illustrator, refer to the diagram: Best way to export a web ready SVG from Illustrator
1. Using object tags/ inline svg
If you're using <object> tags or inline svg, chances are you want to do some animations or create interactivity for your SVG. These settings would best fit in your case:
Styling: Presentation Attributes
Having the styling set to presentation attributes will make it easier for you to animate or style your exported SVG using an external CSS. Reason being presentation attributes are easier to override in CSS according to the CSS precedence rules.
Fonts: Convert to Outlines
Converting fonts to outlines is the only sure-work way currently if you're using Adobe Typekit fonts due to its licensing limitations. Heads-up, your fonts will become non-identifiable numbers & coordinates after exporting. You'll NOT be able to edit nor animate your fonts after exporting. An alternative is to use Google Fonts, this way you can keep your fonts as SVG and style the fonts even after exporting SVG. Here's how it works.
Images: Link
This configuration only matters if there's an image (i.e., PNG, JPG) in your SVG. Changing to “Link” saves file size by 40% in average, compared to embedding. Great! But you'd have to change the link manually after exporting, as the current link is pointing to your local directory.
Object IDs: Layer names
Assuming that you're using descriptive names for your layers, keeping the Object IDs as Layer Names could help you to easily identify certain shapes in your SVG and style them using an external CSS.
Decimal: 4
Set the decimal to be at least 4, as a rule of thumb to ease your work. Use Nano's visual comparison tool to tweak and reduce the decimal points after export, in order to get the lowest file size and making sure your image doesn't break.
Minify: No
To be safe, uncheck the Minify box as it might reduce your SVG codes readability when exported, making it tough for you to dive into your SVG for editing purpose after export. You can always go through Nano once you're done with your edits, and Nano will ensure your SVG is well minified, even in <object> tag mode.
Responsive: No
Width and height will be added into your SVG which you can still modify after export.
2. Using image tags
If you're embedding SVG using an <img> tag just as a static illustration on your website, once you're done with your final edit on Illustrator, you should export your SVG with these settings:
Styling: Internal CSS
It produces the smallest file size for your exported SVG.
Fonts: Convert to Outlines
Your image will look blurry at times as no font optimizations will be applied by your operating system. An alternative is to use Google Fonts and here's why.
Images: Embed
This option only matters if there's an image (i.e., PNG, JPG) in your SVG. Selecting “Embed” ensures your image shows up properly everywhere, as it will be embedded in your SVG as a Base64 image.
Object IDs: Minimal
To reduce file size, each object IDs will be represented by an alphabet so it produces minimal file size. Since you won't be editing your image manually later on, you do not need descriptive names for your objects.
Decimal: 4
Set it to 4 or more by default, you can always optimize and compare your SVG later on in Nano.
Minify: Yes
This ensures that your exported SVG is of the smallest size possible. Illustrator will remove empty groups and blank spaces if minify is selected.
Responsive: No
How everything works in a diagram

We hope this helps, and we'll update this article when there's any new discoveries in the future.

Yi Qian
CXO at Capital Electra X/ Vecta.io. Solving problems by connecting dots between brains, over a cup of coffee.


